29 Dec 2011

Terminal tip: Pipe Viewer

A couple of weeks ago, I held a Linux/Unix elementary course. One of the toughest concepts in that course are the concept of pipes and redirect.

I usually begin explaining pipe as "the output of one command becomes input to the next", and show by an example:

 $ zcat pureftpd.log.gz | cut -f1 -d' ' | sort | uniq | wc -l
 1259073

This command reads a ~550MB large compressed pureftpd logfile (from ftp.uio.no), and finds the number of unique visitors. Several commands are linked together by pipe, so the output of one command is input to the next.

However, I received and interesting question: "Which command use the longest time?"

There is no easy way to tell, we can just take an educated guess. However, we can use a handy little unix utility called "Pipe Viewer" to monitor and measure the data going through a pipe. Install from apt:

  $ sudo apt-get install pv

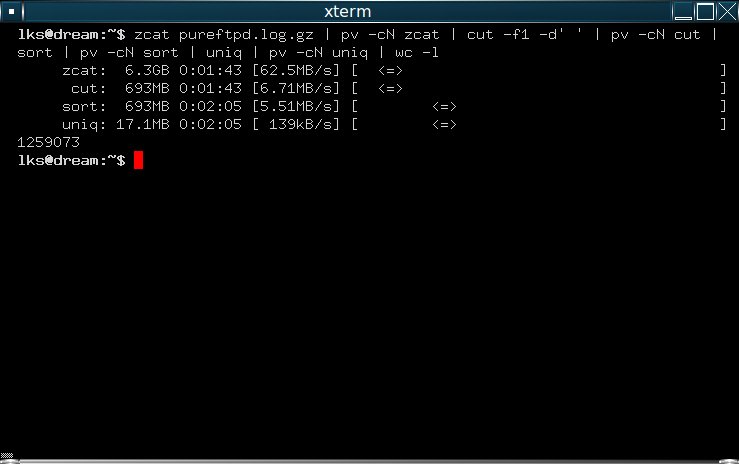
Next, we craft our command above using pv. Since pv behave like cat with respect to input/output, we measure the throughput between each command:

  $ zcat pureftpd.log.gz | pv -cN zcat | cut -f1 -d' ' | \
  > pv -cN cut | sort | pv -cN sort | uniq | pv -cN uniq | \
  > wc -l


As we see from the command, the command that had the slowest throughput was "uniq". Both cut and sort had an impressive 6-7MB/s throughput.

25 Nov 2011

Security architectures in telephony systems

As tradition dictates, before I could defend my Ph.D. dissertation 22th November, I had to give a 45 minutes trial lecture. I was given only the title, and had 14 days to prepare. My title was:

  "The development of security architecture in fixed and mobile telephone systems"

One of the toughest tasks was to interpret the title and limit the scope of the lecture. I discussed with my supervisors and co-researchers and received several tips and relevant references. Then started two intense weeks with study and preparation.

I was satisfied with the disposition and result, and felt comfortable presenting the lecture.

For those interested, the slides can be downloaded here

3 Jun 2011

PhD writing tools

The end is nigh! ...or at least in sight! After four years, my PhD is nearing completion. The plan is to to deliver and defend my thesis sometimes this autumn. In these years, I've used several (free) tools that others might find useful doing the same, or similar, kind of work:

* Zotero - a Firefox-plugin that help me organize papers, citations, web-pages and other resources. All papers/notes are saved in "the cloud" for easy access across multiple terminals (...or Firefoxes). A great tool that enables you to tag, add notes, cross-link papers, add comments to/highlight text in PDFs, etc.

The Zotero Firefox plugin.

* Freemind - a mind-mapping tool. It was the best (open source) mind-mapping tool four years ago - and I believe it still is. Its written in java, so some slowness is included. It has great export functionality as shown in this HTML exported mind-map with the topic "FLOSS development".

Freemind mind-mapping tool.

* Dia - to create professional looking figures for use in papers.

* Dropbox - to sync all my resources (PDFs, papers, presentations, etc) across multiple computers. I might switch to Ubuntu ONE later - but Dropbox works, and it works well.

* OpenOffice (LibreOffice) Draw - to create PhD-posters. Read my howto here.

* I write all my papers in Emacs with the AUCTeX LaTex mode and RefTex to create the TOC speedbar (see screenshot below). For notes I use xpad, and all revision control is done in Subversion (papers, documents, figures, presentations, code).

The desktop manager is Fluxbox with a bunch of key-bindings, bfpager, and gkrellm with bfm-plugin for system monitoring (I like to watch my system resources). Its the same setup I've used for years:

Screenshot of my current workspace: Fluxbox with gkrellm, Emacs, 2x xpads and 2x terminals.

27 Feb 2011

How to get IPv6 on your home network

It has been almost seven years since I last played with IPv6 (link, link). There has been lots of talk of IPv6 lately, and the company I work for has done some real-world IPv6 testing and deployment (check out Tore's IPv6 page: http://fud.no/ipv6/).

Since my local ISP has not deployed IPv6, and probably will not for a long time - I went looking for a "IPv6 tunnel broker". A tunnel broker enables you to tunnel IPv6 traffic over IPv4 to a IPv6 gateway (called "PoP").

So, which tunnel broker to choose from? Wikipedia give me a lot of choices. Several colleagues tipped me of SixXS -- their service is stable and professional, you get a /48 network and they have a PoP here in Oslo they said. Easy choice. 

First some paperwork:

1) First, apply for an account at SixXS:

       http://www.sixxs.net/signup/create/

Be patient - this can take some time since it require manual (human) verification. It took me 8 hours from I applied to my account was accepted.

2) Once you get your username and password, log into the web-interface, and proceed to request a tunnel. Choose "Dynamic NAT-traversing" as type of tunnel. Choose your neares POP, and submit. This process is automated, and it took approx 30 minutes before my request was accepted.

3) When 2) is complete - you have ONE routable IPv6 address. Since we need more than that, we proceed to request a subnet from SixXS webpage. 30 minutes later, my subnet was allocated. 

So I've received from SixXS the following information (not actual IPv6 addresses):
A) IPv6 gateway at SixXS: 2001:FFFF:FFFF:FFF::1/64
B) My local IPv6 gateway: 2001:FFFF:FFFF:FFF::2/64
C) My allocated IPv6 subnet, which is routed to B): 2001:FFFF:EEEE::/48

Next, we're ready to configure/install: 

4) First, install a helper daemon that take care of your IPv6 tunnel automatically. It's called AICCU (Automatic IPv6 Connectivity Client Utility):

  http://www.sixxs.net/tools/aiccu/

On Debian/Ubuntu install it by:

  $ sudo apt-get install aiccu

Enter your SixXS username and password when asked for it. You tunnel interface will be named "sixxs" and enabled (global IPv6 address in red):

  $ ifconfig sixxs
  sixxs     Link encap:UNSPEC  HWaddr 00-00-00-00-00-00-00-00-00-00-00-00-00-00-00-00 
            inet6 addr: fe80::14d8:eeff:142:2/64 Scope:Link
            inet6 addr: 2001:FFFF:FFFF:FFF::2/64 Scope:Global   
            UP POINTOPOINT RUNNING NOARP MULTICAST  MTU:1280  Metric:1
            RX packets:0 errors:0 dropped:0 overruns:0 frame:0
            TX packets:3 errors:0 dropped:0 overruns:0 carrier:0
            collisions:0 txqueuelen:500
            RX bytes:0 (0.0 B)  TX bytes:144 (144.0 B) 

5) Test your IPv6 connection:

  $ ping6 ipv6.google.com
  PING ipv6.google.com(2a00:1450:8004::93) 56 data bytes
  64 bytes from 2a00:1450:8004::93: icmp_seq=1 ttl=52 time=42.5 ms
  64 bytes from 2a00:1450:8004::93: icmp_seq=2 ttl=52 time=44.0 ms
  64 bytes from 2a00:1450:8004::93: icmp_seq=3 ttl=52 time=43.7 ms
  ... 

Good, we have IPv6 connectivity, but only from one host. We want IPv6 on our whole home network.

6) Since we're given a /48 network, it enables us to have 65536 /64 networks. Which should suffice for most needs. Our network architecture would look like this when complete:


We configure our IPv6 gateway (vallhall-r6) to route IPv6 traffic for our local network. First we need to assign a IPv6 address on the actual interface facing our network. This will be our IPv6 gw address for our network:

  $ sudo ifconfig eth0 inet6 add 2001:FFFF:EEEE::1/48
  $ ifconfig eth0  
  eth0      Link encap:Ethernet  HWaddr 52:54:de:ad:be:ef 
            inet addr:192.168.1.100  Bcast:192.168.1.255  Mask:255.255.255.0
            inet6 addr: fe80::5054:ff:feb6:beef/64 Scope:Link
            inet6 addr: 2001:FFFF:EEEE::1/48 Scope:Global
            UP BROADCAST RUNNING MULTICAST  MTU:1500  Metric:1
            RX packets:16849 errors:0 dropped:0 overruns:0 frame:0
            TX packets:13394 errors:0 dropped:0 overruns:0 carrier:0
            collisions:0 txqueuelen:1000
            RX bytes:7336450 (7.3 MB)  TX bytes:7082583 (7.0 MB)

Make it permanent by adding it to:

  # cat /etc/network/interfaces
  ...
  iface eth0 inet6 static
      address 2001:FFFF:EEEE::1      
      netmask 48
      endpoint 2001:FFFF:FFFF:FFF::1  # your SixXS gw
      ttl 64

7) Make sure our gateway route IPv6 traffic:

$ sudo sysctl net.ipv6.conf.all.forwarding=1
  net.ipv6.conf.all.forwarding = 1

Make it permanent, by adding it to:

$ cat /etc/sysctl.conf
  ...
  net.ipv6.conf.all.forwarding=1 

8) You can now configure your network equipment with static IPv6 addresses. Since IPv6 uses hex (and thereby the letters A-F), some words/sentences can be embedded in these addresses:

  baba, babe, bade, bead, beef,
  cede, dace, dada, daff, dead,
  deaf, deed, face, fade, feed, ...

This way, your file-server can have an address like:

  ...:daff:bade:babe

go wild..

9) We don't want to configure all our host manually, so we need some kind of auto-configure. While IPv6 have DHCPv6, (like IPv4's DHCP), a more elegant solution is to use "stateful address autoconfiguration".

The host configure themselves by acquiring a prefix from a local IPv6 router, and combined with the local MAC address, creates a IPv6 address (router advertisements + MAC address of interface = IPv6 address).

We use radvd for sending these "router advertisements". Install and configure:

  $ sudo apt-get install radvd
  $ cat /etc/radvd.conf
  interface eth0 {
      AdvSendAdvert on;
      MinRtrAdvInterval 3;
      MaxRtrAdvInterval 10;
 
      prefix 2001:FFFF:EEEE:aaaa::/64 {
          AdvOnLink on;
                  AdvAutonomous on;

                  # After testing, can be set to 14400
                  AdvPreferredLifetime 30;
                  # After testing, can be set to 86400
                  AdvValidLifetime 30;
          };
  };

Start radvd:

  $ sudo service radvd restart
  Stopping radvd: radvd.
  Starting radvd: radvd. 

10) Excellent! Radvd will now send IPv6 prefix periodically (or when requested by a new client) to your network. All IPv6 capable host should now automatically configure themselves with a IPv6 address.

You should now be able to access IPv6 enabled hosts. Try for example: http://ipv6.google.com 

11) A final warning and advice: ADD A FIREWALL on your IPv6 gateway! Since IPv6 don't use NAT, every hosts that use IPv6 is directly accessable from the Internet. This is a good thing, but it also expose all your IPv6 enabled hosts and their services.

A good starting point for IPv6 firewall:

  https://www.sixxs.net/wiki/IPv6_Firewalling

Good luck!

Troubleshooting tips:

I) Dump IPv6 traffic using tcpdump:

  # tcpdump -i eth0 -vv ip6 or proto ipv6

II) Show your IPv6 routing table:

  # ip -6 r s

II) Check radvd messages

  # radvdump
29 Dec 2010

Convert Word documents (with pictures) to Mediawiki

Update (2011-06-14)! Magnus done a cleaner 'python-only' implementation of this tool - found here: https://github.com/mhagander/word2mediawiki/

This post will explain how to automatically convert MS Word files (with images) to Mediawiki pages. Any filetype OpenOffice supports can be converted.

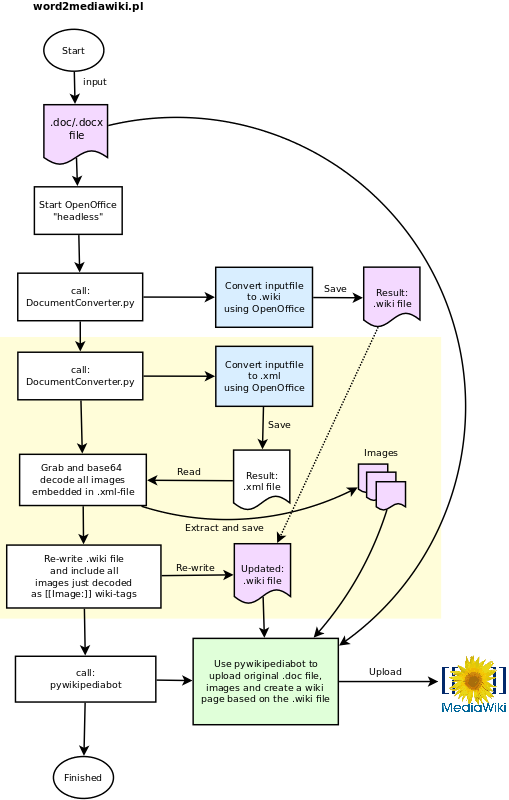
Short explanation: We use OpenOffice to convert the Word files to wiki-syntax, but some voodoo is needed to fetch and upload any images included in the Word-file (the "voodoo" is depicted yellow in the flowchart below):


More detailed explanation: The perl script word2mediawiki.pl take a Word file as input. After some rudimentary checks, it calls the python script DocumentConverter.py which calls OpenOffice to do the actual conversion. This is done twice; we convert to both .wiki and .xml files. Since the .wiki file DO NOT contain any images (it only adds empty [[Image:]] wiki-tags where the images are supposed to be), we convert to .xml that DO include images. Here the images are base64 encoded, so we parse the .xml file, fetch all base64-images, decode and save as ordinary images files. We re-write the .wiki file to update all empty [[Image:]] wiki-tags with the correct image file just decoded. Finally we upload the original Word file (for reference), all images and create a wiki-page based on the .wiki files using the pywikipediabot. Se example below.

Prerequisite and install:

A) Linux - but may work on other platforms as well (not tested)
B) Install Perl and Python
C) Install the Python-UNO bridge. This enable Python to talk to the OpenOffice API (and do the conversion)
 
  # apt-get install python-uno

D) Install OpenOffice. We run OpenOffice "headless", so X is not required.

E) Install the OpenOffice "Sun Wiki Publisher" extension. This adds support for .wiki and .xml export.

  # unopkg add sun-wiki-publisher.oxt

F) Create a word2mediawiki directory. Download the word2mediawiki.pl script, and the PyODConverter script. Note! I've modified the PyODConverter script to support .wiki and .xml. You can download the modified version below:

  $ mkdir word2mediawiki
  $ cd word2mediawiki
  $ wget http://www.larsstrand.no/code/word2mediawiki/word2mediawiki.pl

G) Install pywikipediabot:

  $ svn co http://svn.wikimedia.org/svnroot/pywikipedia/trunk/pywikipedia

H) Configure pywikipediabot. Use the testbox2_family.py file as template for your Mediawiki installation. The file should be self-explanatory:

  $ cd pywikipedia/families 

Add username and password:

  $ cd ..
  $ cat user-config.py
  # -*- coding: utf-8  -*-
  family = 'testbox2'
  mylang = 'en'
  usernames['testbox2']['en'] = u'Wiki-USERNAME'
  password_file = "user-password"
  $ cat user-password
  ("Wiki-USERNAME", "Wiki-PASSWORD")

I) Test pywikipediabot: 

  $ python ./login.py -force -all
  unicode test: triggers problem #3081100
  Logging in to testbox2:en as Wiki-USERNAME via API.
  Should be logged in now

Great! We're ready for our first test.


Convert:

We find a word-file and execute:

  $ ./word2mediawiki.pl ../Testfile.doc
  #############################
  ## Converting /export/home/lks/tmp/Testfile.doc to .wiki and .xml using soffice..
  #############################
  Converting image: ../converted/Testfile_1.jpg
  Converting image: ../converted/Testfile_2.jpg
  Rewrote wiki page with new Image tag: [[Image:Testfile_1.jpg]]
  Rewrote wiki page with new Image tag: [[Image:Testfile_2.jpg]]
  #############################
  ## Conversion complete: ../converted/Testfile.wiki
  ... >>>> Skipping a bunch of output here.

  ## Uploading the wiki page
  ## Exec: python ./pywikipediabot/pagefromfile.py -start:XZXZ42 -end:YZYZ42 -safe -file:../converted/Testfile.wiki
  Reading '../converted/Testfile.wiki'...
  >>> Testfile <<<
  Logging in to testbox2:en as Wiki-USERNAME via API.
  Should be logged in now
  Sleeping for 8.3 seconds, 2010-12-29 18:03:38
  Creating page [[Testfile]] via API
  End of file.
  ## Conversion and upload complete

Note 1: You might get a warning when the pywikipediabot tries to upload the images/.doc file or create the wiki-page. This can happen if the same image/.doc file already have been uploaded. If the a wiki-page with the same name already exists, the bot issue a warning and abort.

Note 2: When OpenOffice convert the .doc file, it might spew out a bunch of warning and/or error messages. These can be ignored. OpenOffice complains a lot. 

Note 3: If the the script exits with a complain about "Can't connect to soffice on port" - just re-run the script. OpenOffice can be a little slow to start. (It will fork into the background the first time).

Note 4: The conversion is nowhere near perfect, and you might want to look over the wiki-page to ensure correct formatting.

Note 5: The filename of the Word file is used as name of the Wikipage. Example: "Testfile.doc" result in "mediawiki/index.php/Testfile"

Example:

27 Nov 2010

Freezing cold server!

The winter has arrived early in Norway this year. Cold winds from Sibir have brought freezing temperatures all over the country. Its now approx -10C here in Oslo, and the temperatures are expected drop further next week. This is good news for my balcony server!

I use Munin to monitor the temperature sensors in the server. One of the CPU cores is showing a nice 6C. One of the disks records 5C. Hopefully the fans will start spinning again once the temperatures starts rising again in the spring...


Since I'm a little worried what will happen if the temperatures drops below 0C inside the disks, I started the folding client to generate some heat (it uses 100% CPU on all cores). The temperature immediately jumped ~5-10 degrees:


Now I'm ready for the winter!

8 Nov 2010

Great Firewall of China

I'm attending the IETF79 meeting here in Beijing. So far, it has been great. Meeting the people I've only read about, and participating in discussions. In particular, I'm looking forward to the kitten WG meeting (GSS-API authentication) and anything related to SIP, in particular sipcore.

Since this is Beijing, we're behind the Great Firewall of China, also called The Golden Shield. It works, as far as I've read, on three layers:
  1. A rudimentary "DNS block" and/or redirect.
  2. If you access the IP-address directly, it sends a TCP RST effectively tearing down your connection. (You browser responds with a "Connection reset")
  3. Content filtering of HTTP-traffic. Especially targeted at news-articles containing certain sensitive information. If a one or more pre-defined keywords appear in the page, the connection is blocked.
A lots of material have been written about the firewall. And several methods can be used to counter the firewall, like using a proxy or VPN-connection. You can also test if your site is blocked by the firewall.

A couple of DNS lookups of blocked sites from behind the firewall:

  $ cat /etc/resolv.conf
  nameserver 202.106.0.20
  nameserver 202.106.46.151

  $ dig +short www.facebook.com
  $ dig +short www.youtube.com
  youtube-ui.l.google.com.
  youtube-ui-china.l.google.com.
  66.249.89.100
  66.249.89.101
  $ dig +short www.blogspot.com
  blogger.l.google.com.
  72.14.203.191

But IETF's NOC have taken over the hotel network (both wired and wireless) and are currently bypassing the firewall. In cooperation with Tsinghua University, two 1Gbps links connect us to the CERNET (with backup to CSTNet).

A couple of test network has also been deployed. Including a IPv6-only network and a IPv6 network using NAT64.

25 Aug 2010

Bubba Two - some performance numbers

Here are my experience with the Bubba Two NAS so far. Below are some performance numbers.

Write locally:

  lks@bubba:~$ dd if=/dev/zero of=bigfile bs=1M count=1K
  1024+0 records in
  1024+0 records out
  1073741824 bytes (1.1 GB) copied, 96.8614 seconds, 11.1 MB/s

Testing raw network traffic:

  lks@bubba:~$ iperf -c 192.168.1.10
  ------------------------------------------------------------
  Client connecting to 192.168.1.10, TCP port 5001
  TCP window size: 16.0 KByte (default)
  ------------------------------------------------------------
  [  3] local 192.168.1.3 port 54697 connected with 192.168.1.10 port 5001
  [  3]  0.0-10.0 sec  76.4 MBytes  64.1 Mbits/sec

Write over NFS (exported with UDP):

  root@titan:/mnt/lks# dd if=/dev/zero of=bigfile bs=1M count=1K
  1024+0 records in
  1024+0 records out
  1073741824 bytes (1.1 GB) copied, 174.882 s, 6.1 MB/s

During the test, the CPU clocks in at about 70%. Since the disk can deliver almost the double of that, I guess the bottleneck is the bus.

Downloading over ftp give around 7-8MB/s (~55-65Mbits/s). Samba around 5-6MB/s (~40-48Mbit/s).

These numbers are more than adequate for most of my multimedia needs. A 720p HD film encoded in MPEG2 needs around 20Mbits/s (~2.4MB/s). But since most films are encoded using MPEG4 (or similar) - a proper encoded 1080p movie will only require around 2-3MB/s.

23 Aug 2010

The Bubba Two NAS

My balcony server finally died on my the other day. It has been running 24/7 for four years in all kinds of weather. I wasn't very surprised - in fact I've been waiting for it to happen. The motherboard had died. I've replaced the motherboard, and its back up. But for how long before a disk or something else fails?

I have backup of (mostly) everything here and there, but I would like to have everything on a separate NAS box. One of the most exciting NAS boxes on the market right now is something called Bubba|Two.

Bubba Two is produced by the Swedish company Excito. Its basically a small Linux server with a big disk. You can use the slick web-interface, or you can ssh into the NAS and treat it like an ordinary Linux-server. It is a LAMP server with SSH running Debian Etch. Samba, proftpd and Mediatomb (upnp) provide the box with file-server capabilities. It even have Squeezecenter installed if you have a Squeezebox (which I happen to have).

Its a ARM processor clocked at 333MHz with 256MB RAM and a 2TB disk. It uses ridiculous low amount of power (max 12W). There is no fan, so the only noise is from the HDD itself - which is barely audible.

Since the default apt-repositories are no longer working (Etch is too old), I change sources.list to:

  deb http://archive.debian.org/debian/ etch main

I can now proceed to install NFS-server, Munin-node and Bind. A couple of minutes later, and its all running smoothly. Too easy.

6 Jun 2010

A professional looking resume made in Latex

Some time ago, I needed an updated resume (and no, I could not "just send a Linkedin link"). I started editing it in OpenOffice, and was (again) struck by how terrible it is to edit, format and align a nice layout. I wanted to use something else - something like Latex.

I've been trying out some Latex resume templates, but none have been good enough (they often have terribly layout). I stumbled across the resume to Martin Michlmayr, and immediately spotted that it was created using Latex. It was nice, clean and looked professional - just what I was looking for. One email later, and he sent me the template he used. He has used and modified res, originally developed by someone else (Michael DeCorte in 1988 according to the header).

If you're interested, you can find the files here:
The only thing missing now is to include a profile picture. I tried a quick and simple includegraphics, but the picture did not float where I wanted, so I have to look into this later.

Update: I also need to check out the ModernCV Latex template: http://www.ctan.org/tex-archive/macros/latex/contrib/moderncv/

Update: I've added support for a profile picture (April 2011).

19 Apr 2010

How to make wine

My soon-to-be-wife and I are brewing delicious fortified wine. We do everything ourselves; we pick various berries, prepare and tap on bottles. This weekend we held a wine-tasting party, and I held a presentation of the whole wine-making-process.

Read more here (8.4MB, Norwegian): http://larsstrand.no/writings/pres/201004-Vin/Hjemmelaget-vin-2010.pdf

6 Jan 2010

Network Weathermap

In my last post I used MRTG to monitor the network equipment. MRTG works great with SNMP, but it only present a graph per network port of the switch/router. So, unless you are the network guy, these graphs do not make much sense.

It would be nice to plug in the data from MRTG into a Network Weathermap of some sort. After searching around and trying different weathermaps, the choice fell on "PHP Network Weathermap". It is actively developed, has good documentation and works great for small/medium-sized networks (the map is hand crafted).

The weathermap can use sources from RRDtool which is the backend used by software like Munin, Cacti and MRTG (if enabled) or from the "original" MRTG (comments on the html-pages generated by MRTG). I'll be using the latter datasource - but I'll be sure to try this weathermap with Munin 1.4 another time.

The configuration for each "map" you create is a text-file. This text file can be created using a (simple) editor or manually hand-crafted. Once you know the (simple) syntax and have an overview of the network, a map is easy to create.

Let's go:

1. First you need MRTG up and running

See my previous blog post.

2. Download and install

  1. Download the latest from here: http://www.network-weathermap.com/download
  2. Unpack under /var/www/html/weathermap
  3. Read the manual if you need additional assistance.

3. Create a new map

The weathermap comes with a (rudimentary) map editor, but I found it much easier to edit the configuration file myself while I consult the reference manual.
The config file for each map consist of three main parts:
  1. Global section
  2. Node section and
  3. Link section (between the nodes)
3.1 Create a global section

In the global section we define the size of the map, title, and so forth. I also define some additional fonts and template for NODE and LINKS.

#
# PHP Weathermap config
#
# Map: Company Name Core Network
#
#

# The size of the map and title
WIDTH 1100
HEIGHT 740
HTMLSTYLE overlib

TITLE Company Name - Core Network Weathermap
TITLEPOS 10 20
TITLEFONT 14

# The output of the map
HTMLOUTPUTFILE company-core-network.html
IMAGEOUTPUTFILE company-core-network.png

# Information about of the newest and oldest data used from MRTG (freshness of the data)
TIMEPOS 10 690 Created: %d %b %Y %H:%M:%S
MAXTIMEPOS 10 710 Newest data: %d %b %Y %H:%M:%S
MINTIMEPOS 10 730 Oldest data: %d %b %Y %H:%M:%S

# We define some additional fonts
FONTDEFINE  8 /var/www/html/weathermap/docs/example/Vera.ttf 8
FONTDEFINE  9 /var/www/html/weathermap/docs/example/VeraBd.ttf 8
FONTDEFINE 10 /var/www/html/weathermap/docs/example/VeraBd.ttf 10
FONTDEFINE 12 /var/www/html/weathermap/docs/example/Vera.ttf 12
FONTDEFINE 14 /var/www/html/weathermap/docs/example/VeraBd.ttf 14

# Here we define the legend
KEYPOS DEFAULT 300 670 Traffic Load
KEYTEXTCOLOR 0 0 0
KEYOUTLINECOLOR 0 0 0
KEYBGCOLOR 255 255 255
KEYFONT 8
KEYSTYLE horizontal

BGCOLOR 255 255 255
TITLECOLOR 0 0 0
TIMECOLOR 0 0 0
SCALE DEFAULT 0 0   192 192 192
SCALE DEFAULT 0 1   255 255 255
SCALE DEFAULT 1 10   140 0 255
SCALE DEFAULT 10 25   32 32 255
SCALE DEFAULT 25 40   0 192 255
SCALE DEFAULT 40 55   0 240 0
SCALE DEFAULT 55 70   240 240 0
SCALE DEFAULT 70 85   255 192 0
SCALE DEFAULT 85 100   255 0 0

SET key_hidezero_DEFAULT 1


# TEMPLATE-only NODEs:
NODE DEFAULT
        MAXVALUE 100
        LABELFONT 9
        LABELOUTLINECOLOR none

# TEMPLATE-only LINKs:
LINK DEFAULT
        BANDWIDTH 1G
        #Use "BWLABEL percent" if you want link utilization in percent
        BWLABEL bits
        WIDTH 3
        BWSTYLE angled
        BWFONT 8
        # NOTE! The next three lines should be on *one* line
        NOTES Current bandwidth utilization (in bits):
           IN {link:this:bandwidth_in:%0.2k} of {link:this:max_bandwidth_in:%0.2k} ({link:this:inpercent:%0.2f}%)
          OUT {link:this:bandwidth_out:%0.2k} of {link:this:max_bandwidth_out:%0.2k} ({link:this:outpercent:%0.2f}%)
        # MRTG graph specific sizes
        OVERLIBWIDTH 500
        OVERLIBHEIGHT 135
        # Arrow comments
        COMMENTFONT 8
        COMMENTSTYLE edge
        COMMENTPOS 50 50

# End of global section

3.2 Next, we define some nodes (switches, routers, servers, ..)

We're plotting both the placement, label, icon and - if any - a "info-link" on each node. The "info-link" is:
  • a link to the MRTG page of the network switch/router, or if its a server,
  • a link to the munin page for that sever.
# regular NODEs:
NODE Internet
        LABEL Internet
        LABELFONT 12
        ICON images/Cisco-network.png
        POSITION 400 100
        NOTES Internet connection - ISP-name
        LABELOUTLINECOLOR none
        LABELBGCOLOR 255 233 170

NODE 10.1.1.1.
        LABEL 10.1.1.1 [1]
        LABELOFFSET S
        INFOURL http://mrtg/10.1.1.1.html
        ICON images/Cisco-Catalyst-access-gw.png
        POSITION 400 400
        NOTES Cisco 6500 [1] - Core Switch

# Additional nodes goes here..
...

3.3 Once all the nodes are defined, we add links between them.

Each link fetches its network utilization from MRTG. So we only need to point each link to the corresponding link in MRTG.

# Internet
LINK 10.1.1.1-Internet
        NODES 10.1.1.1 Internet
        OVERLIBGRAPH mrtg/10.1.1.1/10.1.1.1_241-day.png
 # This gives a nice "mouse-over" graph
        INFOURL http://mrtg/10.1.1.1/10.1.1.1_241.html
 # .. or add the Munin page
        TARGET /var/www/html/mrtg/10.1.1.1/10.1.1.1_241.html
        BANDWIDTH 10G

# Additional links go here..
...

4. We run weathermap to generate the map

  $ cd /var/www/html/weathermap
  $ /weathermap --config configs/company-core-network.conf

You can now point your web browser to the newly created html-file (defined in the global section).

5. The last thing we'll do it to up a cron-job so that the map is updated every five minutes

We let it run one minute after MRTG, so that we get most fresh data:

  1-59/5 * * * * weather /var/www/html/weathermap/weathercron.sh

This script just execute the same commands as in 4).

6. Hints and some nice features

  1. If you do a mouse-over on each link, you'll get the day graph from MRTG in a popup.
  2. If you click on a node, you get either the MRTG page or Munin page for that node.
  3. You get a timestamp for both the oldest and newest data used on the map
  4. If you want additional icons, you can get them from Dia. Dia has a lot of really nice network (Cisco) icons and can export to a large number of formats.


 Examples (with "SET screenshot_mode 1"):


26 Nov 2009

Network monitoring with MRTG

If you work with any kind of networks, the chances are you've heard of, or even used, MRTG. There are not active development of MRTG today, but bugfix patches are still being added now and then.

So why are we still using it? MRTG just works. It stable and robust. And it does what it is supposed to do and nothing else. This makes MRTG still king of monitoring network equipment over SNMP. Well, that is, until Munin 1.4 is released in a couple of days. Munin 1.4 have (better) SNMP support - they are aiming at MRTG.

So until Munin 1.4 is released and stabilizes, I'll use MRTG in production. I've added some minor wrappers around MRTG so that adding and removing nodes gets dead easy. This way, other people can add/remove equipments without knowing too much about MRTG.

Every Linux distribution out there have MRTG in their repository. If yours don't, change distribution or compile MRTG yourself.

1. First of all, we add all our network equipment in a text file:

  $ cat /etc/mrtg/network.cfg
  #
  # SNMP capable switches goes here
  #
  # After adding hosts here, run
  #
  #   /etc/mrtg/mrtgmaker.sh
  #   /etc/mrtg/indexer.sh
  #
  # Format (community is optional) and override default
  #
  # [community]@IP description
  #
  # Example:
  # 192.168.1.1 Core Network Router 1 (Location A)
  # secret@10.0.0.1 Core Network Router 2 (Location B)
  10.1.1.1 Cisco 6500 08/09 Core Network Router 1
  192.168.1.1 Cisco 4948 09/09

2. I create a small script that reads the network equipment from the text-file and generate mrtg.cfg:

  $ cat /etc/mrtg/mrtgmaker.sh
  #!/bin/bash
  #
  # This should be run every time you add a SNMP capable
  # switch under /etc/mrtg/network.cfg
  #
 
  [ -r /etc/mrtg/network.cfg ] || exit 1
 
  ALL=""
 
  while read switch
  do
     if `echo $switch | grep -q ^#` || `echo $switch | grep -q "^$"`; then
        continue
     fi
     HOST=`echo $switch | awk ' { print $1 }'`
     ALL="$ALL $HOST"
 
  done < /etc/mrtg/network.cfg
 
  echo "Harvesting SNMP info from $ALL"
 
  /usr/bin/cfgmaker --snmp-options=:::::2 --show-op-down --global 'AddHead[_]: ' --global 'Options[_]: growright, bits' --global 'HtmlDir: /var/www/html/mrtg' --global 'ImageDir: /var/www/html/mrtg' --global 'LogDir: /var/lib/mrtg' --global 'ThreshDir: /var/lib/mrtg' --community=SECRET --output=/etc/mrtg/mrtg.cfg --subdirs=HOSTNAME $ALL
 
  echo "Config file: /etc/mrtg/mrtg.cfg"
  echo "You should now run /etc/mrtg/indexer.sh"

3. Then we need to add a script to update the HTML

$ cat /etc/mrtg/indexer.sh
#!/bin/bash
#
# This should be run every time you add a SNMP capable
# switch under /etc/mrtg/network.cfg
#

echo '<!DOCTYPE HTML PUBLIC "-//W3C//DTD HTML 4.0 Transitional//EN">
<html>
<head>
<title>MRTG @ Company Name</title>
<meta http-equiv="Content-Type" content="text/html;charset=iso-8859-1">
<meta http-equiv="Refresh" content="300">
<meta http-equiv="Cache-Control" content="no-cache">
<meta http-equiv="Pragma" content="no-cache">
<meta name="robots" content="noarchive">
<link href="favicon.ico" rel="shortcut icon">
<link rel="stylesheet" type="text/css" href="mrtg.css">
</head>
<body bgcolor="#FFFFFF" text="#000000">
<h1>MRTG @ Company Name</h1>
<img src="company_logo.png" height="135" width="130" align="right" alt="Company Name logo"/>
<blockquote>
' > /var/www/html/mrtg/index.html

while read switch
do
if `echo $switch | grep -q ^#` || `echo $switch | grep -q "^$"`; then
continue
fi

IP=$(echo $switch | cut -d" " -f1)
IP=${IP#*@}
DESC=$(echo $switch | cut -d" " -f2-40)
DATE=$(date)
DNSNAME=$(dig +short -x $IP 2> /dev/null)

echo "Indexing $IP"
/usr/bin/indexmaker --nolegend --subtitle='<h2><a href="../">Back home</a></h2>' \
--pageend="<em>MRTG @ Company Name - generated on $HOSTNAME</em>" \
--addhead='<link rel="stylesheet" type="text/css" href="/mrtg.css">' \
--output /var/www/html/mrtg/$IP.html --filter name=~$IP \
--title="Network utilitization for $DNSNAME ($IP)" /etc/mrtg/mrtg.cfg

if [ -z $DNSNAME ]
then
echo "<font size="+1">⇒ <a href="$IP.html">$IP</a> — $DESC</font> <br>" >> /var/www/html/mrtg/index.html
else
echo "<font size="+1">⇒ <a href="$IP.html">$IP</a>, $DNSNAME — $DESC</font> <br>" >> /var/www/html/mrtg/index.html
fi

done < /etc/mrtg/network.cfg

echo "
</blockquote>
<p>MRTG is also used as datasource for our Network Weathermap — <a href="http://weathermap/">http://weathermap</a>
<hr>
<em><font size=\"-1\">More info: <a href=\"http://wiki/mediawiki/index.php/MRTG\">
http://wiki/mediawiki/index.php/MRTG</a></font><br></em>
<em><font size=\"-1\">Generated by $HOSTNAME:$0</font></em>
</body>
</html>" >> /var/www/html/mrtg/index.html


4. We add a stylesheet to make thing a little prettier:

  $ cat /var/www/html/mrtg/mrtg.css
  body {
    background-color: #EFEFEF;
    color: #000000;
    font-family: sans-serif;
    font-size: 12px;
  }
 
  h1 {
    background-color: #CCCCCC;
    font-family: sans-serif;
    font-size: 18px;
    font-weight: bold;
  }
 
  h2 {
    font-family: sans-serif;
    font-size: 16px;
    font-weight: bold;
  }
 
  a {
    text-decoration: none;
  }

5. We test:

  # /etc/mrtg/mrtgmaker.sh
  Harvesting SNMP info from 10.1.1.1 192.168.1.1
  Config file: /etc/mrtg/mrtg.cfg
  You should now run /etc/mrtg/indexer.sh
  # /etc/mrtg/indexer.sh
  Indexing 10.1.1.1
  Indexing 192.168.1.1

We are then presented with an overview page then takes us to each switch/router:

27 Aug 2009

Slackware 13 released!

Slackware 13 was released yesterday. It's the oldest currently maintained Linux distribution out there, and with good reason. It is clean, simple and without the "bells and whistles" that clobbers up so many other distributions.

Slackware was for myself (and for many of my friends and colleagues) my first encounter with Linux. I used Slackware for many years, and still do on occasions. Its a great distribution to really learn Linux and not learn a Linux distribution. I will say that if you really know Linux (and Slackware), you will know most Linux distributions as well.

You would think Slackware was abandoned for other more popular distributions nowadays, but there is still a large active Slackware community and user base out there. It is in fact, one of the most downloaded Linux distributions (in both MB and number of hits) for Norway's largest ftp-site:

http://ftp.uio.no/stats/usage_200907.html#TOPURLS

16 Jun 2009

Quick and strong file-encryption with OpenSSL

To quickly encrypt a file with a password of your choice you can use OpenSSL. OpenSSL supports a whole range of ciphers, including government approved encryption algorithms. The encryption algorithm AES is the only accepted open confidentiality algorithm here in Norway (read more here). AES is the new algorithm replacing DES. You can read all about AES and DES elsewhere.

To encrypt a file using AES with a 256 bit key-length:

  $ openssl enc -e -aes-256-cbc -salt -in filename.odp -out filename.odp.enc
  enter aes-256-cbc encryption password:
  Verifying - enter aes-256-cbc encryption password:

The encrypted file is now found as filename.odp.enc

Since symmetric block ciphers process one block of data at the time (AES uses a block length of 128 bits), it is important that we use CBC mode. CBC prevents repeating plaintext to create the same (repeating) ciphertext. Use option -p to have OpenSSL print out the salt, key and IV used:

$ openssl enc -e -aes-256-cbc -salt -p -in filename.odp -out filename.odp.enc
enter aes-256-cbc encryption password:
Verifying - enter aes-256-cbc encryption password:
salt=92BCA2EA0EABCA62
key=1BCE6E251E86A6379066B634FD20CD3090981B50CDF3FF5634C49DCF4A1812A5
iv =9604DF84236BB3965083830396277636

To decrypt the file: Note! If you type in the wrong password, you'll get garbled output since there is no way to check if the password is correct.
$ openssl enc -d -aes-256-cbc -in filename.odp.enc -out filename.odp
enter aes-256-cbc decryption password:

And the decrypted file is found as filename.odp

For example: You can encrypt a file with a password of your choice. Send the file to the receiver, and then communicate to him over another secure communication channel what the password is (and that you've used "aes-256-cbc").

19 May 2009

Encrypted swap, tmp and home partition in Ubuntu 9.04

I really would like to have an encrypted swap, tmp and home partition on my laptop. In case it gets stolen or if I should forget it somewhere, I can be sure that no-one would be able to read my private files. In this mini-howto I set my home partition using LVM, but using a regular partition should work just fine. This howto should also work, with minor modification, if you use another distribution than Ubuntu.

Updated:
May 2009: Updated for Ubuntu 9.04. Added encrypted /tmp.
May 2008: Init for Ubuntu 8.04.


Note! Both the "server" and "alternate" Ubuntu ISO-images provide the option to encrypt your home directory (but in a different way using eCryptfs. Swap and /tmp are not encrypted). It might be an easier solution if you find this page too hard to follow. The difference? They are two different implementations. eCryptfs is file level encryption, LUKS is block device (/dev/sda3). Think of it like SSL vs. IPSec. Both have their advantages and drawbacks. Read more here and here

By using Linux Unified Key Setup (LUKS) setting up encrypted partition in Linux is done in no time.

Prerequisites

Install required packages:

  # apt-get install lvm2 cryptsetup libpam-mount

The device-mapper should be active (if not, reboot):

  $ ls -l /dev/mapper/
  total 0
  crw-rw---- 1 root root  10, 61 2009-05-19 15:39 control

..with support for crypto:

  # dmsetup targets | grep crypt
  crypt            v1.6.0

Good. Now we're ready.

Part I: Setting up encrypted swap

Step 1: Disable your current swap partition.

  # swapoff /dev/sda2

Step 2: Fill your swap with random data.

  # dd if=/dev/urandom of=/dev/sda2 bs=1M
  1954+0 records in
  1953+0 records out
  2048094208 bytes (2.0 GB) copied, 529.177 s, 3.9 MB/s

As you see, this might take some time depending on your swap size. So go grab a coffe.

Step 3: Configure encrypted swap.

Add this to your /etc/crypttab

  # cat /etc/crypttab
  ...
  cryptoswap /dev/sda2 /dev/urandom cipher=aes-cbc-essiv:sha256,size=256,hash=sha256,swap

Why /dev/urandom and not /dev/random? The latter blocks until it got enough entropy to continue, urandom don't. So if you use random instead urandom you might have to wait during boot until enough entropy is collected. (It does help to type your keyboard and move the mouse.) Use /dev/random if you're really paranoid.

Next, change your swap entry in /etc/fstab to this:

  # cat /etc/fstab
  ...
  /dev/mapper/cryptoswap swap swap sw 0 0

For every time we boot, swap will be encrypted with a different encryption key.

Step 4: Test it.

Reboot to test.

We now have an encrypted swap:

  # cat /proc/swaps
  Filename                Type        Size    Used    Priority
  /dev/mapper/cryptoswap                  partition    2000084    0    -1

  # cryptsetup status cryptoswap
  /dev/mapper/cryptoswap is active:
    cipher:  aes-cbc-essiv:sha256
    keysize: 256 bits
    device:  /dev/sda2
    offset:  0 sectors
    size:    4000185 sectors
    mode:    read/write

Good. Now we're safe right?

Part II: Dealing with /tmp

To protect /tmp, we have two choices. 1) we can encrypt it like we did with swap or 2) we can create a ramdisk. The content of a ramdisk don't survive a reboot and /tmp rarely is used for any big files, its is also a good option. But, paranoid as we are, we choose option 1)

The setup is almost identical as for swap:

Step 1: Setting up a tmp partition using LVM.

If you use a regular partition, you can easily skip this step.

  # pvcreate /dev/sda3
  Physical volume "/dev/sda3" successfully created
  # vgcreate vg_storage /dev/sda3
  Volume group "vg_storage" successfully created
  # vgchange -a y vg_storage
  0 logical volume(s) in volume group "vg_storage" now active
  # lvcreate -L500M -nlv_tmp vg_storage
  Logical volume "lv_tmp" created

For more details on how to use LVM, please check out the excellent LVM HOWTO.

Step 2: Fill the partition with random data.

  # dd if=/dev/urandom of=/dev/vg_storage/lv_tmp
  1024001+0 records in
  1024000+0 records out
  524288000 bytes (524 MB) copied, 139.983 s, 3.7 MB/s

Step 3: Add entry in /etc/crypttab

  # cat /etc/crypttab
  ...
  cryptotmp /dev/vg_storage/lv_tmp /dev/random cipher=aes-cbc-essiv:sha256,size=256,hash=sha256,tmp

Now, since /tmp is encrypted with a new key every time, the filsystem must be created every time as well. The option "tmp" fixes that for us and calls mkfs before mount. Since it is created with filesystem ext2, we add in fstab:

  # cat /etc/fstab
  ...
  /dev/mapper/cryptotmp /tmp ext2 defaults 0 0

Step 4: Test it.

Reboot to test.

We now have an encrypted /tmp partition as well. Great!

  # cryptsetup status cryptotmp
  /dev/mapper/cryptotmp is active:
    cipher:  aes-cbc-essiv:sha256
    keysize: 256 bits
    device:  /dev/mapper/vg_storage-lv_tmp
    offset:  0 sectors
    size:    1024000 sectors
    mode:    read/write

Part III: Creating and setting up an encrypted home partition

Step 1: Setting up a home partition using LVM.

If you use a regular partition, you can easily skip this step.

  # lvcreate -L20G -nlv_home vg_storage
  Logical volume "lv_home" created

Step 2: Fill your soon-to-be home partition with random data.

  # dd if=/dev/urandom of=/dev/vg_storage/lv_home
  20481+0 records in
  20480+0 records out
  21474836480 bytes (21 GB) copied, 5554.23 s, 3.9 MB/s

This will take even longer than the swap partition. So go for lunch or something.

Step 3: Initialize the partition and set initial key.

Remember, if you use a weak password, your screwed. If you forget the password, its game over.

  # cryptsetup -c aes-cbc-essiv:sha256 -y -s 256 luksFormat /dev/vg_storage/lv_home
 
  WARNING!
  ========
  This will overwrite data on /dev/vg_storage/lv_home irrevocably.
 
  Are you sure? (Type uppercase yes): YES
  Enter LUKS passphrase:
  Verify passphrase:
  Command successful.

We use cipher "aes-cbc-essi", since the default is vulnerable to Watermarking attack.

Step 4: Create a device mapping.

  # cryptsetup luksOpen /dev/vg_storage/lv_home cryptohome
  Enter LUKS passphrase:
  key slot 0 unlocked.
  Command successful.

This will create a device mapping, as can bee see under:

  $ ls -l /dev/mapper/
  total 0
  crw-rw---- 1 root root  10, 61 2009-05-19 15:39 control
  brw-rw---- 1 root disk 252,  4 2009-05-19 15:52 cryptohome
  brw-rw---- 1 root disk 252,  1 2009-05-19 15:39 cryptoswap
  brw-rw---- 1 root disk 252,  2 2009-05-19 15:39 cryptotmp
  brw-rw---- 1 root disk 252,  3 2009-05-19 15:52 vg_storage-lv_home
  brw-rw---- 1 root disk 252,  0 2009-05-19 15:39 vg_storage-lv_tmp

Note that LVM also uses the device-mapper (that is why LVM volumes also are listed).

Or, you can use the command "dmsetup ls" to list the mapped devices:

  $ dmsetup ls
  cryptoswap    (252, 1)
  vg_storage-lv_tmp    (252, 0)
  cryptotmp    (252, 2)
  vg_storage-lv_home    (252, 3)
  cryptohome    (252, 4)

Step 5: Create a filesystem.

We now have an encrypted partition. To use it, we need to create a filesystem on it:

  # mkfs.ext4 -j -m 1 -O dir_index,filetype,sparse_super /dev/mapper/cryptohome
  mke2fs 1.41.4 (27-Jan-2009)
  Filesystem label=
  OS type: Linux
  Block size=4096 (log=2)
  Fragment size=4096 (log=2)
  1310720 inodes, 5242623 blocks
  52426 blocks (1.00%) reserved for the super user
  First data block=0
  Maximum filesystem blocks=0
  160 block groups
  32768 blocks per group, 32768 fragments per group
  8192 inodes per group
  Superblock backups stored on blocks:
      32768, 98304, 163840, 229376, 294912, 819200, 884736, 1605632, 2654208,
      4096000
 
  Writing inode tables: done
  Creating journal (32768 blocks): done
 
  Writing superblocks and filesystem accounting information: done
 
  This filesystem will be automatically checked every 28 mounts or
  180 days, whichever comes first.  Use tune2fs -c or -i to override.

Step 6: Testing!

We start by closing and reopen the encrypted partition before we mount it:

  # cryptsetup luksClose cryptohome
  # cryptsetup luksOpen /dev/vg_storage/lv_home cryptohome
  Enter LUKS passphrase:
  key slot 0 unlocked.
  Command successful.
  # mkdir -p /mnt/cryptohome
  # mount /dev/mapper/cryptohome /mnt/cryptohome
  # touch /mnt/cryptohome/testfile
  # ls /mnt/cryptohome/
  lost+found   testfile

We can also confirm that it works by issuing the command:

  # cryptsetup status cryptohome
  /dev/mapper/cryptohome is active:
    cipher:  aes-cbc-essiv:sha256
    keysize: 256 bits
    device:  /dev/mapper/vg_storage-lv_home
    offset:  2056 sectors
    size:    41940984 sectors
    mode:    read/write

Now would be a good time to move your current home to this partition.

Finally we umount:

  # umount /mnt/cryptohome
  # cryptsetup luksClose cryptohome

Step 7: Cryptohome mounted at boot or at login?

Now you have to take a choice. A) You can enable the partition at boot time, but then the boot sequence is interrupted asking you for the LUKS password. B) If you want the partition automatically mounted when you login, skip to the next section.

Instead of manually typing in password, you can have the key stored externally - for instance on a usb-stick. Read more about that here.

You want to enable mounting at boot time? Then update /etc/crypttab:

  # cat /etc/crypttab
  ...
  cryptohome /dev/vg_storage/lv_home none luks

And /etc/fstab:

  # cat /etc/fstab
  ...
  /dev/mapper/cryptohome    /home/ ext4 relatime,errors=remount-ro 0 2

When you now reboot, the boot process is interrupted asking you for the LUKS password. If you type it correctly, the home partition is mounted. When you now log in, you will have an encrypted home partition ready waiting for you.

Part IV: Automatically mount when logging in.

A more elegant solution would be to automatically mount the home partition the same time you log in. This require that you use the same password for login as for the encrypted partition. (Actually that is not entirely true. You may have the password stored on file somewhere. But in this howto, we assume you have the same password for both.)

Step 1: Remove home partition from /etc/fstab

If there is an entry to your (encrypted) home partition in /etc/fstab, remove it

  # cat /etc/fstab
  ...
  /dev/mapper/cryptohome    /home ext4 relatime,errors=remount-ro 0 2 # this gotta go

Step 2: Update /etc/crypttab

Make sure the you have a line in /etc/crypttab that reads as follows:

  # cat /etc/crypttab
  ...
  cryptohome /dev/vg_storage/lv_home noauto luks

Step 3: Configure pam_mount

Add the following entry in /etc/security/pam_mount.conf.xml. This file is heavily commented, and it may be useful to read the comments.

  # cat /etc/security/pam_mount.conf.xml
  ...
 

Step 4: Configure PAM

No longer necessary. As of 9.04 all options already included.

Step 5: Test!

Log out and back in. You should now have an encrypted home:

  $ df -h
  ...
  /dev/mapper/_dev_mapper_vg_storage-lv_home
                         20G  296M   20G   2% /home

Congratulation, you now have an encrypted swap, tmp and home partition!

A final advice: Take regular backups.

Useful links: